
10. Enemies
Let's give the hero an opportunity to be heroic by adding a Bandit which he can fight. First, add a new bandit using the StoryScript Create Enemy command:
npm run sce BanditOpen the Bandit.ts file in your game's enemies folder and change it like this:
export function Bandit() {
    return Enemy({
        name: 'Bandit',
        description: description,
        hitpoints: 10,
        attack: '1d6',
        items: [
            Sword()
        ]
    });
}
As with items, the attack property isn't a standard StoryScript property. You'll need to add it to the enemy.ts file in your game's interfaces folder:
export interface IEnemy extends IFeature, StoryScriptIEnemy {
    items?: IItem[];
    // Add game-specific enemy properties here
    attack?: string;
}
Also note that I gave the bandit a sword, just like the one our hero can pick up at home. When an enemy is defeated, the items he carries are dropped on the floor in that location.
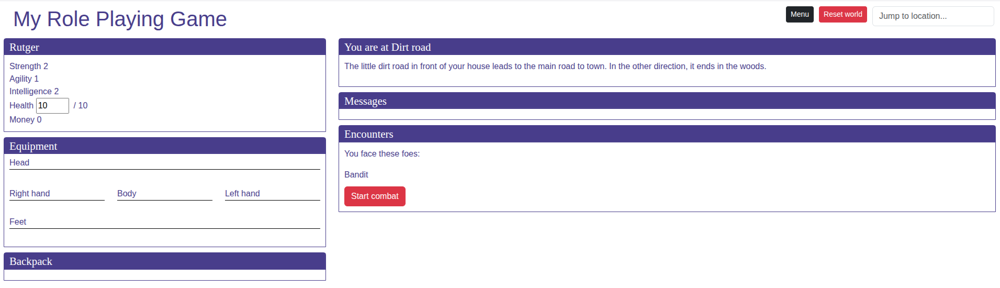
Now we need to add the bandit to our world. Add a 'Dirt road' location that is reachable from the Start location and add the enemy there:
name: 'Dirt road',
description: description,
destinations: [
    {
        name: 'Enter your home',
        target: Start
    }
],
enemies: [
    Bandit()
],
When you go to the dirt road, you'll see the bandit. Below him, a 'Start Combat' button is available:
When you start combat and click the Attack button, nothing happens. That's because there is no default combat system in StoryScript, as combat rules as well as how heroes, enemies and items are defined can vary wildly. You will have to program such a system yourself, which requires some skill with TypeScript. For now, let's just add a very simple system to experiment with. Open your rules.ts and find the fight method. Modify it like this:
combat: {
    fight: (game: IGame, combatRound: ICombatSetup): void => {
        const character = combatRound.characters[0] as Character;
        const enemy = combatRound.enemies[0];
        const damage = game.helpers.rollDice(combatRound[0].item?.attack ?? 0) + character.strength + game.helpers.calculateBonus(character, 'damage');
        game.logToCombatLog('You do ' + damage + ' damage to the ' + enemy.name + '!');
        enemy.currentHitpoints -= damage;

        if (enemy.currentHitpoints <= 0) {
            game.logToCombatLog('You defeat the ' + enemy.name + '!');
        }

        combatRound.enemies.filter(enemy => { return enemy.currentHitpoints > 0; }).forEach((enemy: IEnemy) => {
            const damage = game.helpers.rollDice(enemy.attack) + game.helpers.calculateBonus(enemy, 'damage');
            game.logToCombatLog('The ' + enemy.name + ' does ' + damage + ' damage!');
            character.currentHitpoints -= damage;
        });
    }
}
Note that I’m grabbing the character and the enemy from the first entry in the combatRound object here. For a single-character game this works. In a multi-character game, each character will get a turn each combat round, and the combatRound will have an entry for all of them.
This combat system is very simple. It just rolls a six-sided die for the hero and adds his strength and weapons damage bonus to the result. It writes a message to show the damage done, and subtracts the result from the enemy's hitpoints. When the enemy has 0 or less hitpoints, another message is written and the method exits, returning true for winning combat. If not, the enemy attacks the player in the same way.
Click the Attack button. After a few clicks the bandit might be defeated and you see the combat victory screen. Or you might lose and face the game over screen instead. When you win and close the combat modal, notice that the Bandit's sword is now lying on the ground.
While we're at it, let's add a combat action to illustrate how that works. We'll allow the hero to run instead of fight, so he can be heroic another day. add a combat action to the Dirt road location's TS file:
combatActions: [[
        'RunInside',
        {
            text: 'Run back inside',
            execute: (game: IGame) => {
                game.commands.go('Start');
                game.logToActionLog(`You storm back into your house and slam the
                        door behind you. You where lucky... this time!`);
                return true;
            }
        }
]]
When you go out the door to face the bandit, you should see the option to run back inside. When you take it, you will be told you ran away.
With all of this in place, we can return to the locked basement from tutorial 8 and give the bandit the key to the trap door. The hero will have to take it from him to proceed into the basement. Keys are a special kind of Item that have an open property. We're now adding a regular key, but a key is a broad concept. you could also require a boat to pass a river or a rocket to travel to another planet, to name just a few possibilities!
The open property is also a barrier action, with a text and a function to execute when opening the barrier. StoryScript comes with two actions that you can use to open barriers, a regular open function that you can add to a barrier action, and an openWithKey action that you can add to a Key. Let's use the latter to create our key. Create a new BasementKey using the StoryScript Create Key command:
npm run sck BasementKeyUpdate the code of the BasementKey so it looks like this:
export function BasementKey() {
    return Key({
        name: 'Basement key',
        keepAfterUse: false,
        open: {
            text: 'Open',
            execute: OpenWithKey((game: IGame, barrier: [string, IBarrier], destination: IDestination) => {
                game.logToLocationLog('You open the trap door. A wooden staircase leads down into the darkness.');
            })
        },
        equipmentType: EquipmentType.Miscellaneous
    });
}
Now that we have our key, we need to tell StoryScript that it can be used to remove the Trap Door barrier. Open the Garden.ts file and update it like this:
game.currentLocation.destinations.add({
    name: 'Enter the basement',
    target: Basement,
    barriers: [
        ['TrapDoor', {
            key: BasementKey,
            name: 'Wooden trap door',
            actions: [[
				...
            ]]
        }]]
});
The trap door should now have an Open action as soon as you're in possession of the Basement key! Give the key to the bandit:
export function Bandit() {
    return Enemy({
		...
        attack: '1d6',
        items: [
            Sword(),
            BasementKey()
        ]
    });
}
When you now defeat the bandit, pick up the key and return to the garden, you'll have the option to open the trap door:
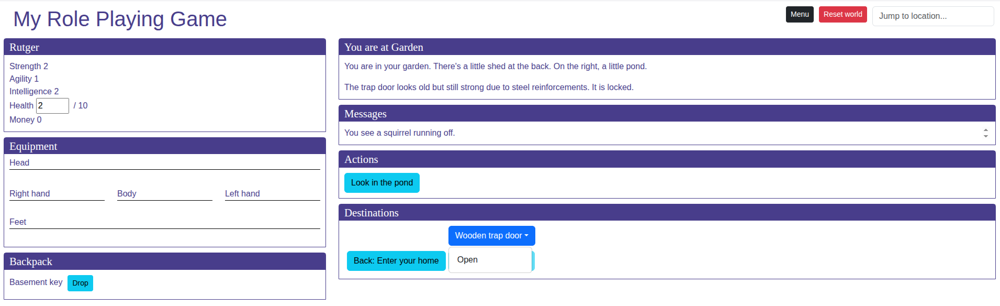
When the Open action is chosen, the barrier will be removed, including any actions remaining. You can access the basement destination.
When you open the door, the key is now removed. If you want the player to keep it, change the keepAfterUse property to true.