
8. Locations
There’s much more you can do with locations than we’ve seen so far. A nice feature is that you can have multiple descriptions in a location's HTML file that you can choose from while running the game. As an example, let's make it so that the location description changes depending on the time of day, with a text for daytime and a text for night time. To do this, you need to repeat the <description> tag and add an attribute to the second tag that you will use to select it, for example 'night' (remember to use the ssDescription snippet to add an additional description quickly). Our Start.html will then look like this:
<description name="day">
    <p>
        You are at home. You can hear the birds singing in the garden.
    </p>
</description>
<description name="night">
    <p>
        You are at home. the frogs are croaking in the pond.
    </p>
</description>
Note that when you don't add a name attribute to the description tag, it will get de name 'default'. But you can have only one 'default' description!
To actually show the night time description between 6 p.m. And 6 a.m., we need to create a selector in our location's TS file. Modify your start.ts like this:
export function Start() {
	return Location({
		name: 'Home',
		description: description,
		descriptionSelector: (_: IGame) => {
			const date = new Date();
			const hour = date.getHours();

			if (hour <= 6 || hour >= 18) {
				return 'night';
			}

			return 'day';
		},
		destinations: [
		]
	})
}
Your browser should now show you the day or the night description, depending on the actual time at your location.
Locations are the main building blocks for your StoryScript world, and within them you can place all other core StoryScript entities except Maps. Below is an indication of what you can add:
export function Start() {
    return Location({
        name: 'Start',
        description: description,
        descriptionSelector: (game: IGame) => {
            return '';
        },
        destinations: [],
        enterEvents: [],
        leaveEvents: [],
        actions: [],
        combatActions: [],
        triggeredActions: [],
        features: [],
        enemies: [],
        persons: [],
        items: [],
        trade: []
    });
}
We've seen Features in action already in the tutorial on adventure gaming, and we've also covered Descriptions and the descriptionSelector by now. We'll save items, enemies, persons and trade for later, and in this tutorial first focus on events and actions. We've seen how to link locations using destinations, but there is more to destinations and we'll cover that at the end of this tutorial.
Let's enhance our walking around experience a bit by creating a new Garden location and adding an event to it. Events are anything you can think of that happens once, when the player first enters a new location or first leaves one. Right now, we'll do something very simple and just write a message to the ActionLog component. Modify your Garden.ts like this, using the ssFunction snippet to add an event function. Note that each event needs to have a unique name (unique in the scope of the location), which is used by the StoryScript engine:
enterEvents: [
	[
		'Squirrel',
		(game) => {
		    game.logToActionLog('You see a squirrel running off.');
		}
	]
]
Go to the garden. The first time you go there (and first time only), you should see the message appearing under 'Messages' (the ActionLog component):

This is of course rather trivial, but events can be used for powerful stuff as you have the full game API at your disposal in the event function through the game object. Check out the API documentation once you feel comfortable enough with the StoryScript concepts described in these tutorials.
Apart from events, you can add things to do to a location via actions. There's three flavours: regular actions are available during exploration. combat actions will only be shown during combat (what's in a name!). triggered actions are actions that are activated in another way, such as triggers in the location descriptions (see below). Examples of actions you might want to add are search, to find more items when the character is alert enough, opening chests, etc.
Let's add two regular actions to the garden, one to search the shed and one to look in the pond. Add this code to Garden.ts, using the ssAction snippet. Like events, actions needs to have a unique name:
actions:[
	[
		'SearchShed',
		{
			text: 'Search the Shed',
			execute: (game: IGame) => {
				// Add a new destination.
				game.currentLocation.destinations.add({
				    name: 'Enter the basement',
				    target: Basement,
				});
			}
		}
	],
	[
		'LookInPond',
		{
			text: 'Look in the pond',
			execute: (game: IGame) => {
				game.logToLocationLog(`The pond is shallow. There are frogs and snails in there, but nothing of interest.`);
			}
		}
	]
]
Note that I had to add the Basement location to be able to add the new destination. If you are following along, add that location too. Your garden now looks like this:
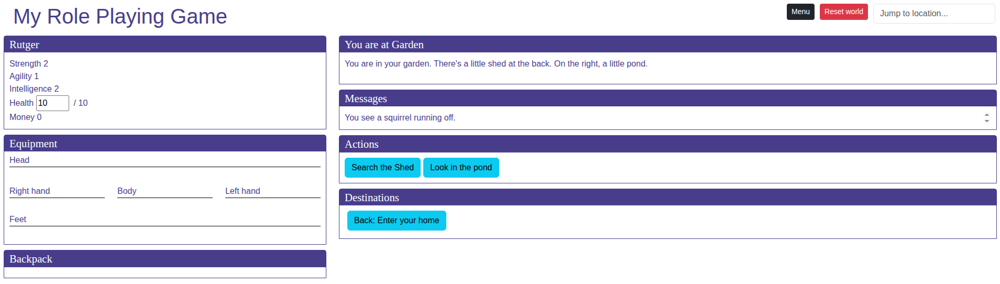
When you press the Search button, a new destination will be added and the Search button removed. Look in the pond will remove the action and write to the location description using the locationLog. If you want to keep the button when it is clicked, have the action's execute method return true (check out the API).
Right. On to the next way in which we can make the world more interesting. When locations are less easy to reach, it'll be more rewarding to get there. You can add Barriers to destinations that impede the hero's progress. Barriers can be anything from doors, locked gates, rivers, chasms or even leaving the atmosphere of a planet.
As an example, let's add a trap door as a barrier between the garden and the shed basement. Open the Garden.ts file and add the following barrier code to the Basement destination. Use the ssBarriers and ssBarrier snippet to add the barrier and then the ssAction snippet to add the barrier actions:
game.currentLocation.destinations.add({
    name: 'Enter the basement',
    target: Basement,
    barriers: [
        ['TrapDoor', {
            name: 'Wooden trap door',
            actions: [[
                'Inspect',
                {
                    text: 'Inspect',
                    execute: (game: IGame) => {
                        game.logToLocationLog('The trap door looks old but still strong due to steel reinforcements. It is locked.');
                    }
                }
            ]]
        }]]
});
Like actions and events, barriers need a unique name in the scope of the location. Actions are added in the same way as you add them to a location.
When you now search the garden shed, the Basement destination is greyed out because it is blocked by the trap door:
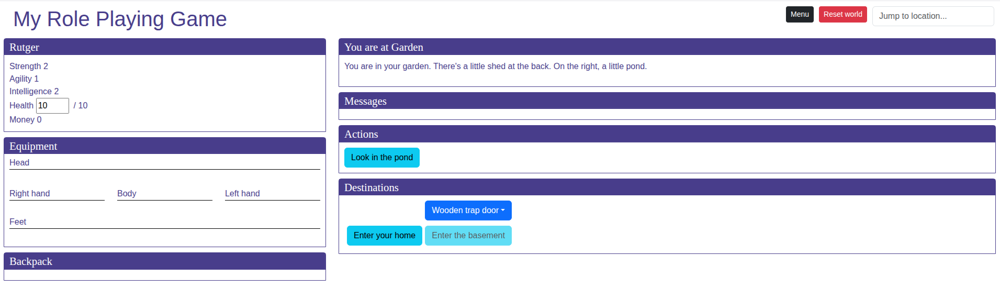
Clicking on the trap door will show you the actions available on the barrier. When you open the options and click 'Inspect', a message will be written to the location description and the Inspect action will be removed. However, the barrier is not and the basement is still blocked! We'll return to this later, because in order to open the trap door we're going to use a key, and a key is an Item. Items are the topic of the next tutorial.
But before moving on, let's discuss triggered actions. They are not used in MyRolePlayingGame, but are a new feature that you can use for locations. It works well when combined with maps, for example. You can see them in action in MyInteractiveMap, when you visit the Westphalia location and hover over a highlighted region name in the text, Luxembourg or Liège. These names are created as triggers in the location's description .html file, and they look like this:
... the Duchies of Guelders, <span class="secondary-location" data-trigger="secondary-location-trigger" data-location="luxembourg">Luxembourg</span>, and the County ...As you can see, triggers use data attributes. The first marks a tag as a trigger with the data-trigger attribute. The value of this attribute is the name of the action in the location's .ts file. When using a mouse, the trigger will fire and execute the action when the mouse is over the trigger tag or when it is clicked. On touch devices, the trigger fires when the trigger tag is touched. You can use additional data attributes to pass arbitrary data to the trigger function. In this case, I'm passing the location id so I know what location to highlight on the map. The triggeredActions section of this location looks like this:
triggeredActions: [[
    'secondary-location-trigger',
    (game: IGame, activate: boolean, data) => {
        triggerSecondaryLocation(game, data, activate ? 'visible' : 'hidden');
    }
]]
The second argument of the trigger function is a flag indicating the state of the trigger. When active, the mouse is over the trigger tag or the trigger is clicked/pressed. When inactive, the mouse has left the trigger or a previously activated trigger is clicked/pressed again. The third argument holds the data you collected using the data attributes in the .html file, minus the trigger.
Of course, there is also a code snippet available to create triggers in the .html file, ssTrigger.