
7. Role Playing Games
Now that you have a basic grasp of the first three types of stories/games you can create with StoryScript, it is time to dive deeper and develop a basic understanding of the full power it has to offer. In terms of story and interaction, there is nothing more complex to build than a Role Playing Game (RPG), in which the player interacts with the story world and its inhabitants and developing new skills and growing more powerful through these experiences.
Create a new game like before so you can make a fresh start. Also change the game name (I'll use 'My Role Playing Game' for this demo). You can find the example in the Games/MyRolePlayingGame folder or online. For this game, we won't be creating a custom GameContainer component but instead use everything the default one has. That means we'll have a lot to discuss! This tutorial will focus on creating a character, while later ones will cover all of the StoryScript entities in-depth, including the ones you've already been using (except for maps, as tutorial 3 covered most of what there is to them).
Central to the RPG is the player character, or a party of player characters. StoryScript doesn’t have multiplayer support, so you’ll play all of the player characters. The default amount of characters is 1, but you can choose to have a party by specifying a different number in the setup section of your rules.ts file:
setup: {
    numberOfCharacters: 3
}
This tutorial works with one player character. When you work with more, you set up the process of defining a character in the same way. The same process will be used for each character in the game.
You want to let the player create a hero with whom to play the game. To determine what such a hero looks like, open the character.ts file in your game's folder. You can add properties where it says so. Say we want to measure our hero's strength, agility and intelligence, which start at 1 and max out at 10 (we do not do anything to enforce that yet). We then add:
// Add character properties here.
strength?: number = 1;
agility?: number = 1;
intelligence?: number = 1;
Note the question mark after each property. This tells TypeScript that they're not required. They are for our purposes, but for StoryScript to work with these properties that are specific to each game, they need to be declared with '?'. If you omit it, TypeScript will complain and refuse to compile your code.
Next, we need to choose the equipment slots that we will use. By default, all default slots are used: head, body, hands, leftHand, leftRing, rightHand, rightRing, legs, feet. These slots are inspired by the first Diablo game 😃. For now, let's use head, body, left and right hands and feet only. Remove the slots we don't need from the character.ts file. Note that you can also add your own custom slots, if you want to have a whole different setup. Our slots end up looking like this:
constructor() {
	this.equipment = {
	    // Remove the slots you don't want to use. Omit them in your IEquipment interface too!
	    head: null,
	    body: null,
	    leftHand: null,
	    rightHand: null,
	    feet: null
	    // Add your custom slots here. Make sure you add them in your IEquipment interface too.
	}
}
Note that once you created a character and started your game, changing these slots will NOT change anything in your browser. Your character's state is stored to make sure it isn't lost during browser refreshes. Also, pressing the Reset world button will NOT change anything. That's because there is no default character state to fall back to. During the character creation process, you make some choices to turn your character into what he or she is. There's no 'default' hero. If you are changing slots, you'll have to start a new game.
As the instructions say, we also need to adjust our equipment.ts file in the interfaces folder. Do that like this:
export interface IEquipment extends Omit<
    StoryScriptIEquipment,
    'amulet'
    | 'hands'
    | 'leftRing'
    | 'rightRing'
    | 'Legs'
> {
    // Add game-specific equipment slots here
}
Now, we want the player to make some choices when creating the hero that will determine his or her starting stats. For this we need to define the character creation process. Open the rules.ts file in your game's folder and find the line that says “Add the character creation steps here, if you want to use character creation.”. We will ask the player what name he wants to give to his character and ask two questions, showing the second question only after he answered the first. To do that, we'll create three steps (if we wanted to show both questions at the same time, we would define only two steps, one for the name and one containing both questions). Find the getCreateCharacterSheet method and add the three steps listed below inside the steps square brackets. To do this quickly, you can use the ssAttributes, ssAttribute and ssAttributeEntry snippets to set up attribute steps and ssQuestions, ssQuestion and ssQuestionEntry snippets for question steps:
{
    attributes: [
        {
            question: 'What is your name?',
            entries: [
                {
                    attribute: 'name'
                }
            ]
        }
    ]
}
{
questions: [
{
question: 'As a child, you were always...',
entries: [
{
text: 'strong in fights',
value: 'strength',
bonus: 1
},
{
text: 'a fast runner',
value: 'agility',
bonus: 1
},
{
text: 'a curious reader',
value: 'intelligence',
bonus: 1
}
]
}
]
}{
questions: [
{
question: 'When time came to become an apprentice, you chose to...',
entries: [
{
text: 'become a guard',
value: 'strength',
bonus: 1
},
{
text: 'learn about locks',
value: 'agility',
bonus: 1
},
{
text: 'go to magic school',
value: 'intelligence',
bonus: 1
}
]
}
]
}Note that in this example we’re using questions to determine our character attribute values, adding bonuses depending on the answers chosen. Another way to set attributes is to use attribute questions. Here, we use an attribute only for name and we don’t specify the minimum, maximum, or value properties. This allows the player to add a free text answer. If you want to set attributes using number inputs, you should also specify the min, max and value properties up front. Additionally, on the attributes property you can specify the numberOfPointsToDistribute. You can use this when you add attribute entries (ssAttributeEntry snippet) for the attributes in your game. The player will then be able to distribute points up to this number, starting from the value you specify for the attribute up front.
Your browser should now ask you for a name, and after that show you the questions with the answers you defined:

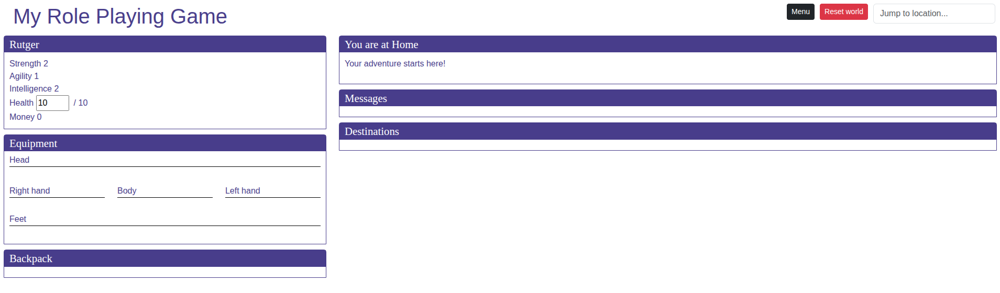
When you're done creating your character, you'll want to display some vital statistics in the character sheet on the left-hand side of the screen. You can specify which character attributes to list in the rules. Let's add the three attributes we defined. Health and Money will be displayed by default:
getSheetAttributes: (): string[] =>  {
	return [
	    'strength',
	    'agility',
	    'intelligence'
	]
}
When you finished character creation, you should now see something like this:
Now that we have created our hero, we'll dive into the core StoryScript entities in more detail. First, we'll learn how to do much more with Locations.